Using the Pi as an USB gadget
This is a working document on turning a Raspberry Pi 4 into a USB gadget which could be plugged into a computer to offload compiling without needing to place the PI on a corporate network.
Minimum Equipment needed
- Raspberry Pi model 4 with 4 GB of RAM
- A cable capable of USB3 AND charging, using the USB-C port of the Raspberry pi.
- Computer with a USB 3.0 port capable of 3 Ampere charging.
- Flash SD card of 4GB or greater size.
Initial deployment equipment:
- The raspberry pi will need to be able to connect to a network at least once before it can be turned into a gadget.
- Network cable
- computer with SD card connection to ‘plug’ initial SD card into.
System Assumptions
- The network that is planned to be used is the
192.168.42.0/24network which is normally a non-routed network. Please check that your own network is not using this for internal usage. - The laptop will be using
192.168.42.1on one port to act as a router. - The pi will be running at the IP
192.168.42.15
Important Caveats
In trying to replicate this work, we found that various USB-C cables and ports on computers were not capable of handling the 15.3 Watts ( 3 Amperes and 5.1 Volts) that the device needs to power itself. Some cables will fry out at that level and others will ‘work’ but the Raspberry Pi4 will crash regularly. Many computers may limit some USB ports to only to 2 Amperes so check the specific hardware you have for what can be done.
Build The Image
You can build the image using the image definition and tooling available in the sample-images and following the documentation about building images).
You will simply have to build the gadget image which pulls in the
pi_gadget
package and configures it a bit:
Flash The Image
Once the image is built, you can flash it on the SD card, for example using:
Important
In the example, the block device is called /dev/sdX. You must change this to match the block device used in your system.
At this point, don’t boot the system on the SD card just yet, we need to check the existing connections on the client (eg: laptop) before we can boot the pi.
Set-up Networking On a Linux Client
On the laptop connected to the raspberry pi:
- Ensure the
cdc_etherkernel module is loaded:
- List the connections known to NetworkManager:
The output will look something like:
$ nmcli con show
NAME                UUID                                  TYPE      DEVICE
eno1                f9f26b94-4de9-460b-ac4f-64095653d3a0  ethernet  eno1
Wired connection 1  40b62ac2-786a-3c65-8cb8-23767d273ff4  ethernet  --
- Boot the pi
You can now boot the pi by plugin its USB cable into the client.
- Find the connection to the pi
Once the pi has boot, you can list the connections known to NetworkManager again and there should be a new one:
$ nmcli con show
NAME                UUID                                  TYPE      DEVICE
eno1                f9f26b94-4de9-460b-ac4f-64095653d3a0  ethernet  eno1
enp0s26u1u6         44394827-8c3d-408a-a991-c36924cbd7ae  ethernet  enp0s26u1u6
Wired connection 1  40b62ac2-786a-3c65-8cb8-23767d273ff4  ethernet  --
So we can deduce that the connection enp0s26u1u6 is the one pointing to the
running raspberry pi.
- Modify the connection to the pi
At this point, we need to instruct NetworkManager about the IP range used by the connection with the pi:
Set-up Networking On a Windows Client
Plug in the raspberry pi to the computer running windows. Wait for it to boot (which can take a while). When it is fully booted a UsbNcm network device should appear in the Windows “Network Connections” window, like this:
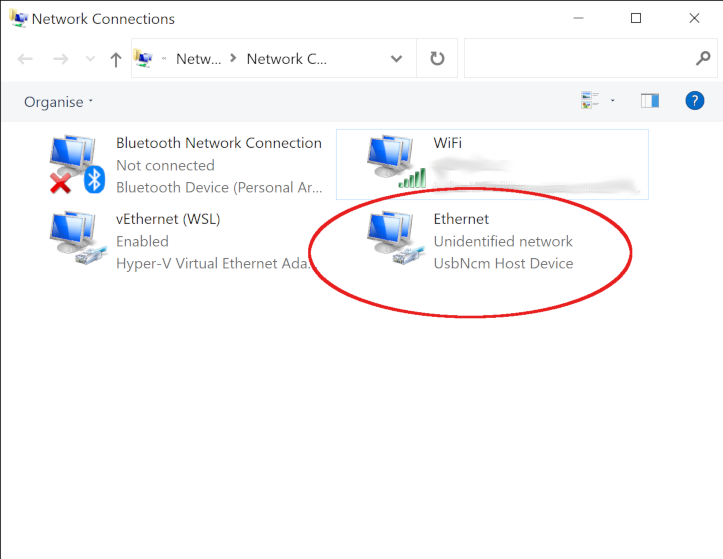
Right click on this device and select “Properties” from the menu, this should bring up a window like;
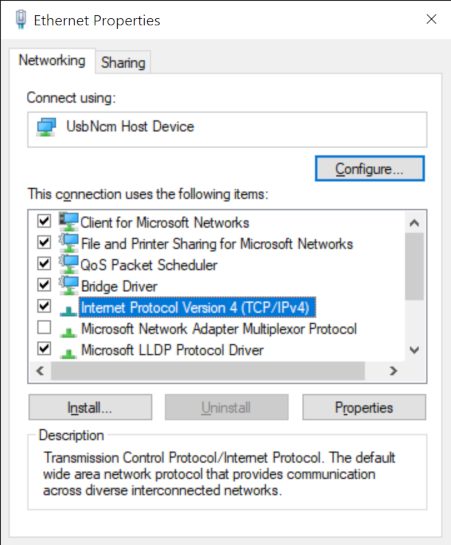
In this window, first click on “Internet Protocol Version 4 (TCP/IPv4)” and then on properties. In this dialog, select “Use the following IP address”, and then enter “192.16.42.1” in the IP address, and “255.255.255.0” in the subnet mask. This should look like this:
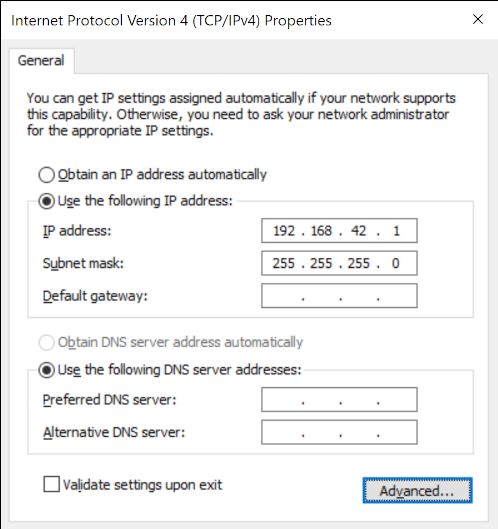
Then close all windows to apply the changes. This should allow you to now connect to the pi via this connection.
Set-up Networking On a MacOS Client
Plug in the raspberry pi to the computer running MacOS. Wait for it to boot (which can take a while). When it is fully booted open the network configuration.
You can access it via: System Preferences then Network.
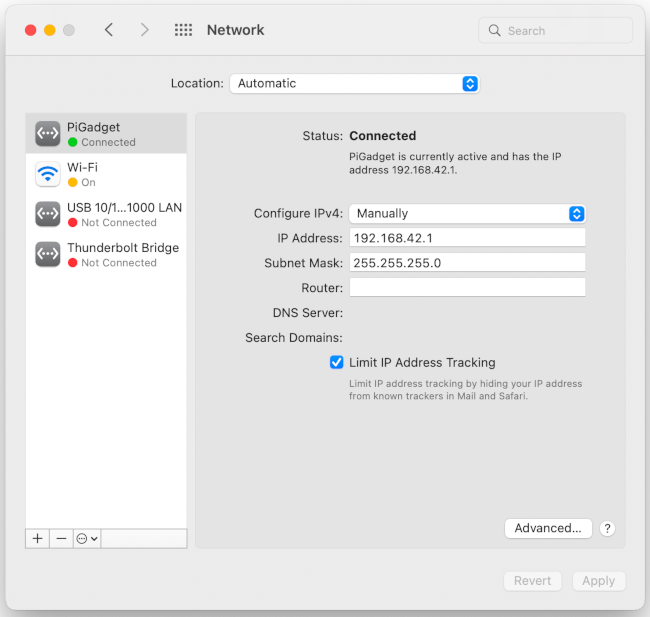
There you should see a PiGadget network listed on the left hand-side column.
You will need to click on Configure IPv4 for that network and set it to
manually. There you configure the IP Address to 192.168.42.1 and
Subnet Mask to 255.255.255.0.
The outcome should look like the screenshot
Then click on Apply apply the changes and you can close the window. This should
allow you to now connect to the pi via this connection.
Connect To the Pi
You should now be able to ping the raspberry pi at the hard-coded IP it uses:
$ ping 192.168.42.15
PING 192.168.42.15 (192.168.42.15) 56(84) bytes of data.
64 bytes from 192.168.42.15: icmp_seq=1 ttl=64 time=3.44 ms
64 bytes from 192.168.42.15: icmp_seq=2 ttl=64 time=1.93 ms
...
You can also ssh into it:
Remember that both root and guest have password as default password.
Note
On CS9, ssh is configured to not allow direct access via the root user.
You can now use this device to work as a standalone gadget and could set it up further as a build system.
Cockpit
The Cockpit project is a web-based graphical interface intended for everyone to manage a system.
We have pre-installed and configured cockpit on our gadget images, so once your raspberry pi has booted you can visit https://192.168.42.15:9090, you may have to accept the self-signed SSL certificate. From there you can browse this interface to manage your raspberry pi, it even comes with a terminal window!