Getting started
The Automotive SIG manages several artifacts:
- Automotive Stream Distribution (AutoSD): This project is a binary distribution developed within the SIG that is a public, in-development preview of the upcoming Red Hat In-Vehicle Operating System (OS).
- RPM repositories: These are RPM repositories produced by the Automotive SIG to enhance AutoSD. New packages or features can be developed and hosted there to expand the capabilities of the AutoSD.
- Sample images: These are images built with OSBuild using packages from the AutoSD, the Automotive SIG repositories, or other sources. They are examples of how to use AutoSD.
AutoSD
Similar to the upstream-downstream relationship between CentOS Stream and Red Hat Enterprise Linux (RHEL), AutoSD is an upstream repository for Red Hat In-Vehicle OS.
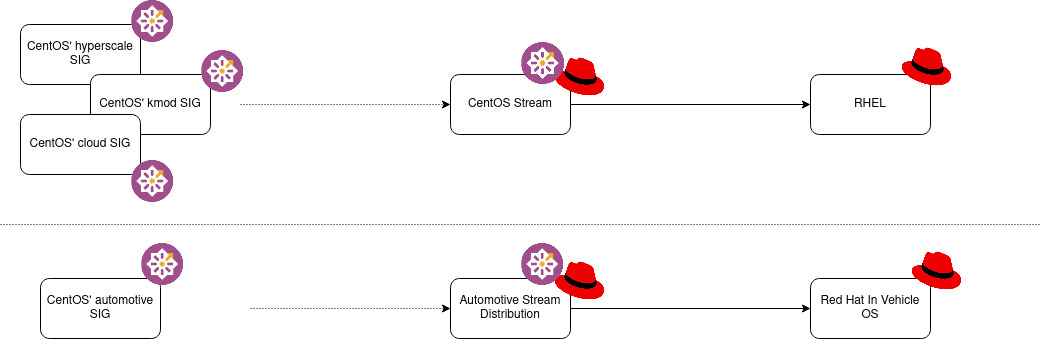
AutoSD is a binary Linux distribution based on CentOS Stream, but with a some divergences. For example, AutoSD relies on the kernel-automotive package rather than the CentOS Stream kernel package.
The community, customers, and partners can explore AutoSD to see what will land in Red Hat In-Vehicle OS. Like CentOS Stream, AutoSD is open to contributions using similar mechanisms.
Installing QEMU
To run AutoSD virtual machines (VMs), you must install a QEMU machine emulator on your system. QEMU is supported on a variety of operating systems. If your operating system is not listed here, or for more information about QEMU, see Download QEMU.
Note
The example commands in this procedure call x86_64 architecture components.
If you prefer to use an AArch64 architecture, replace qemu-system-x86 with qemu-system-arm in the commands of these procedures.
Installing QEMU on AutoSD, CentOS Stream, Fedora Linux, or RHEL
Prerequisites
A machine running AutoSD, CentOS Stream, Fedora, or RHEL
Procedure
- Install QEMU:
sudo dnf install qemu-system-x86
Installing QEMU on Ubuntu
Prerequisites
- A machine running Ubuntu
Procedure
- Install QEMU:
sudo apt-get install qemu-system-x86
Installing QEMU on MacOS
Prerequisites
- A machine running MacOS
- Homebrew installed
Procedure
- Install QEMU:
brew install qemu
Installing QEMU on Windows
Prerequisites
- A machine running 64-bit Windows 8.1 or later
pacmanpackage manager from MSYM2 installed
Procedure
- Install QEMU:
pacman -S mingw-w64-ucrt-x86_64-qemu
Using pre-built images
All pre-built AutoSD images can be found in the: nightly repo. The repo features both x86_64 and aarch64 architecture images.
To explore the sample images, see sample images.
Running a developer QEMU image
The developer image has extra storage compared to other images.
Note
The example commands in this procedure call x86_64 architecture images. If you prefer to use AArch64 architecture images, replace x86_64 with aarch64 in the commands of this procedure.
Procedure
- Use
grepto retrieve the exact name of the developer image:
AUTOSD_IMAGE_NAME="$(curl https://autosd.sig.centos.org/AutoSD-9/nightly/sample-images/ | grep -oE 'auto-osbuild-qemu-autosd9-developer-regular-x86_64-[0-9]+\.[A-Za-z0-9]+\.qcow2\.xz' | head -n 1)"
Note
This step is necessary, because images are uploaded every day using unique build IDs, which causes the name of the image to change slightly on a daily basis.
- Download the developer QEMU image with
wget:
$ wget \
-O auto-osbuild-qemu-autosd9-developer-regular-x86_64.qcow2.xz \
https://autosd.sig.centos.org/AutoSD-9/nightly/sample-images/$AUTOSD_IMAGE_NAME
- Decompress the developer image using
xz:
xz -d auto-osbuild-qemu-autosd9-developer-regular-x86_64.qcow2.xz
- Run the image with the
qemu-systemCLI:
$ /usr/bin/qemu-system-x86_64 \
-drive file=/usr/share/OVMF/OVMF_CODE.fd,if=pflash,format=raw,unit=0,readonly=on \
-drive file=/usr/share/OVMF/OVMF_VARS.fd,if=pflash,format=raw,unit=1,snapshot=on,readonly=off \
-smp 20 \
-enable-kvm \
-m 2G \
-machine q35 \
-cpu host \
-device virtio-net-pci,netdev=n0 \
-netdev user,id=n0,net=10.0.2.0/24,hostfwd=tcp::2222-:22 \
-drive file=auto-osbuild-qemu-autosd9-developer-regular-x86_64.qcow2,index=0,media=disk,format=qcow2,if=virtio,snapshot=off
- Log in using “root/password” as the default username/password.
Building your own developer QEMU images
Extend the base operating system beyond the capabilities of the pre-built images by building your own developer image. Use images from the sample-images repository as a starting point.
The images directory in sample-images contains OSBuild manifest files, indicated by the mpp.yml extension.
The mpp.yml files contain instructions, or OSBuild stages, that create new OS images.
The naming convention for image files is: $distro-$target-$image_type-$os_itype.$arch.$file_type.
See this file name as an example:
autosd-qemu-developer-regular.x86_64.qcow2
distro: autosdtarget: qemuimage_type: developeros_type: regulararch: x86_64file_type: qcow2
The git repo directory also contains a Makefile script that streamlines the image building process.
Prequisites
- A Fedora/CentOS/RHEL system
- OSBuild osbuild tooling
For more information about tools for building images, see Building images.
Procedure
- Clone the
sample-imagesrepository:
git clone https://gitlab.com/CentOS/automotive/sample-images
- Navigate to the checked out directory:
cd sample-images/
- Explore the different types of images that you can build:
make list-targets
Note
The output of the make list-targets command is quite extensive.
Use grep to narrow your search.
- Optional: Filter the command output:
make list-targets | grep developer
- Build an image using an existing manifest:
sudo make autosd-qemu-developer-regular.x86_64.qcow2
Note
This command invokes osbuild, which must be run as the root user.
- After the build succeeds, run the generated
qcow2image:
./runvm autosd-qemu-developer-regular.x86_64.qcow2
Note
Run ./runvm -h to check all available options for that command.